Update Date: EPFO, the Employee Provident Fund Organization, is a key government body in India handling employee provident funds, insurance, and pensions since 1952.
Managed by the Ministry of Labour and Employment, it’s notable for its large membership and financial dealings.
Today, we’ll focus on how EPFO members who’ve left their job can update their ‘Date of Exit‘ and leaving reason in their EPF account, an essential step in managing their EPF details.
Procedure to Update Date of Exit in Your EPF Account
If you want to update Date of Exit in your EPF account, you can follow the following steps:
- First, you will need to visit the official EPFO website at https://www.epfindia.gov.in.
- Then, go to the “Services section”, available on the main page, and click on “For Employee.”
- Next, you will need to enter your UAN (Universal Account Number) and password and click the Sign-In button.
- Thereafter, a page will open. Here, in the top menu bar, you will have to click on the View button.
- Then, you will see some options in a drop-down menu, and from those options, click on “Service History.”

- As you do this, a page will open in front of you, containing all your information, such as how many companies you have worked for.
- If the data for all the companies you have worked for is appearing correctly, that’s great. However, if it shows “Not Available” in the “DOE EPS” field, you can update it.
- To update, you will need to click on the “Manage” option in the top menu bar.
- Thereafter, you will see several options. From these options, click on “Mark Exit.”
- Then a page will open in front of you, and you will need to click on “Select Employment” to choose your company.
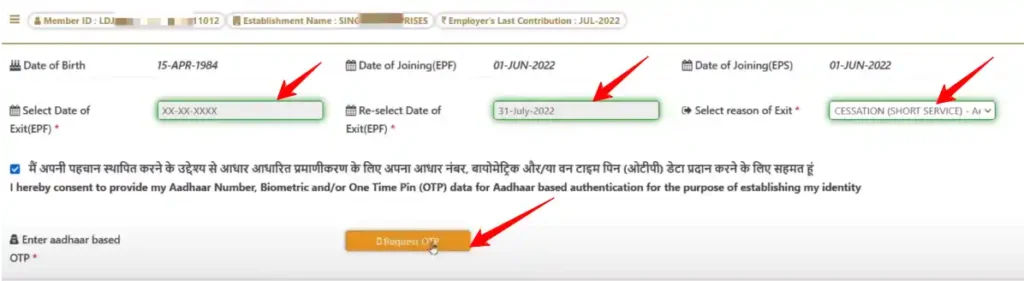
- Thereafter, a form will appear where you have to fill in the “Date of Exit” and “Deselect Date of Exit.” Additionally, there is more information provided that you should carefully review.
- Next, check the checkbox below and click on “Request OTP.”
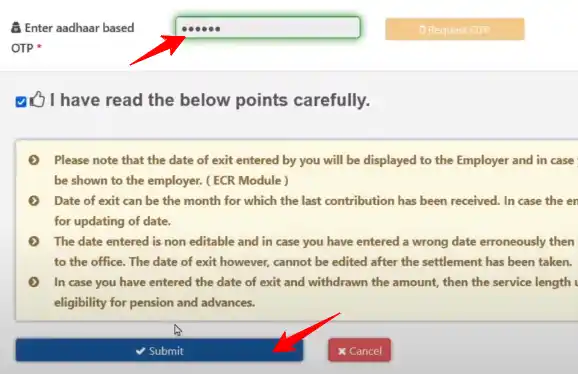
- Upon doing this, an alert will appear on your screen, and you will need to click on the “Yes” button.
- Upon doing so, you will receive an OTP on your registered mobile number. Then, enter the OTP, check the checkbox below, and click on the “Submit” button.
- After clicking, an alert popup will appear on your screen once again. Click on “Update” in that popup.
- After some time, you will receive an alert “Updated Successfully.” Then, you will need to click the “OK” button.
After doing this, a page will appear in front of you mentioning that your information has been updated. After this, if you wish, you can withdraw your money immediately, but it is recommended to perform this action one day later.
Watch Video-